Modern applications are no longer running on a single server.
Today's applications are distributed across multiple containers, multiple servers, cloud platforms, and different regions. Applications need to scale automatically, recover from failures, handle traffic spikes, and remain available 24/7.
Managing all of this manually is almost impossible.
This is exactly why Kubernetes was created.
Kubernetes helps developers and DevOps teams manage containerized applications automatically at massive scale.
But when beginners first open Kubernetes documentation, it honestly feels overwhelming.
You hear terms like:
- Control Plane
- Worker Nodes
- API Server
- Scheduler
- etcd
- kubelet
- Pods
- Services
and suddenly everything starts looking complicated.
The good news?
Kubernetes Architecture becomes much easier once you understand how the components connect together internally.
In this guide, we'll understand Kubernetes Architecture step-by-step in the exact workflow Kubernetes follows behind the scenes.
By the end of this article, you'll clearly understand:
- How Kubernetes works internally
- What each Kubernetes component does
- How Pods are scheduled
- How networking works
- How services expose applications
- How Kubernetes automatically manages containers
What is Kubernetes?
Kubernetes is an open-source container orchestration platform used to deploy, manage, scale, and automate containerized applications.
In simple words:
Docker helps you run containers.
Kubernetes helps you manage thousands of containers automatically.
Google originally created Kubernetes based on their internal container management system called Borg.
Today Kubernetes has become the industry standard for container orchestration.
Companies like:
- Netflix
- Spotify
- Airbnb
- Shopify
- AWS
use Kubernetes heavily in production.
Why Kubernetes Was Needed
Imagine you have only 2 containers.
Managing them manually is easy.
Now imagine:
- 500 containers
- Multiple servers
- Traffic spikes
- Server failures
- Auto scaling requirements
- Zero downtime deployments
Managing containers manually becomes chaos very quickly.
Kubernetes solves these problems automatically.
It can:
- Restart failed containers
- Scale applications automatically
- Balance traffic
- Deploy updates safely
- Manage networking
- Handle service discovery
This is why Kubernetes became so important in modern DevOps and Cloud Engineering.
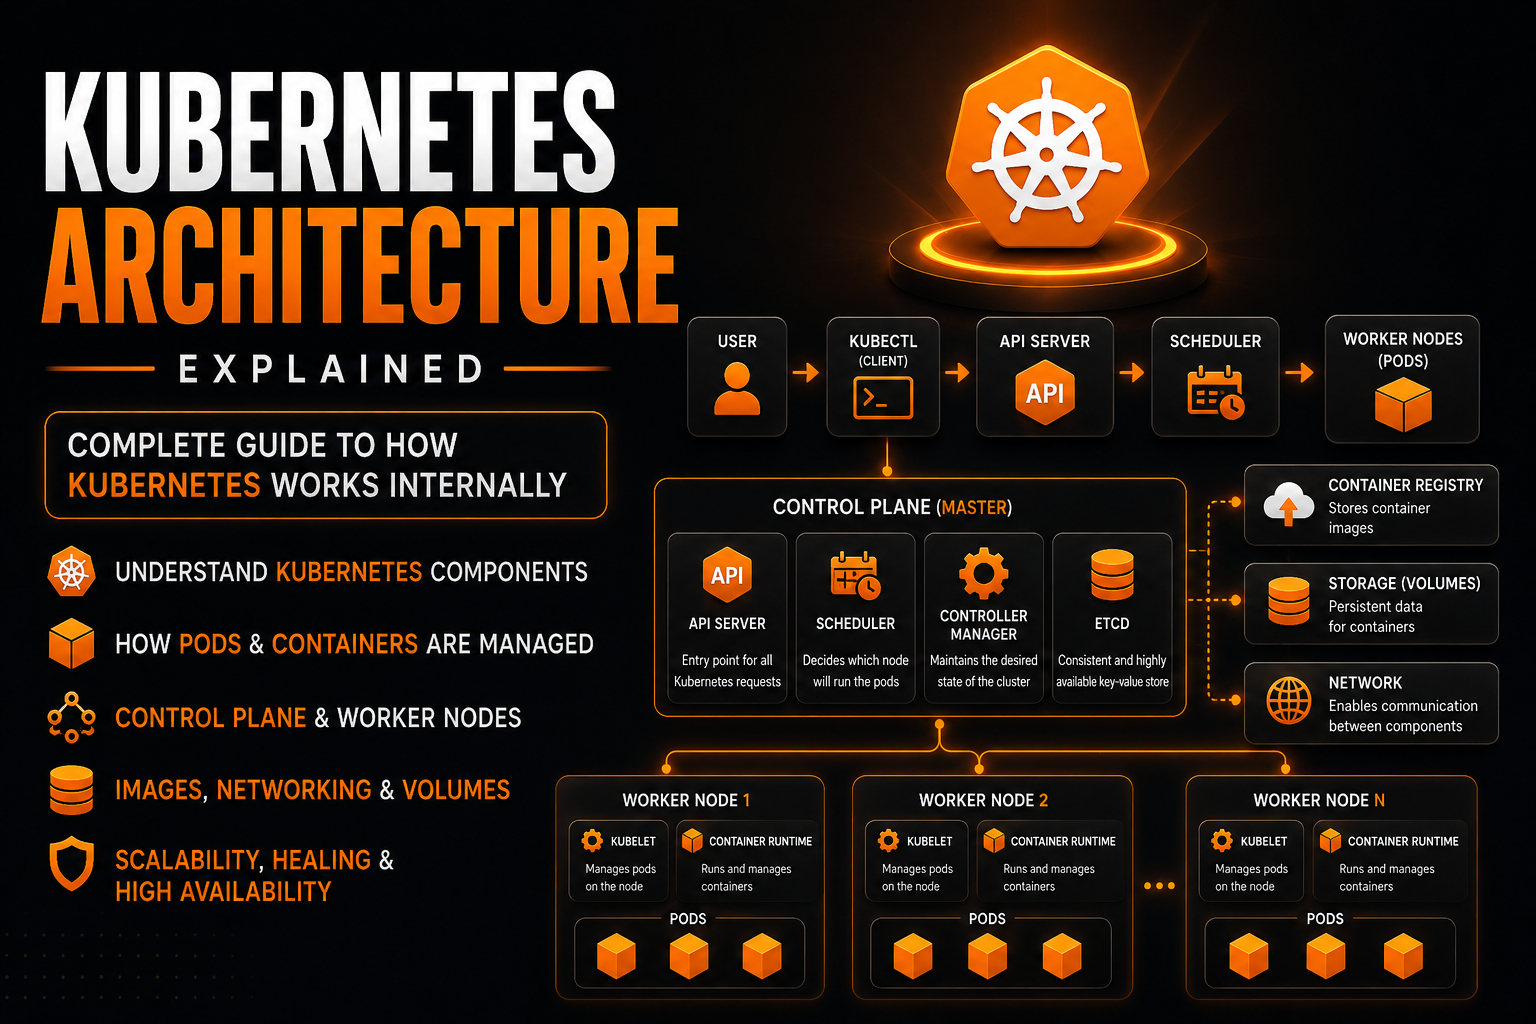
Kubernetes Architecture Overview
Kubernetes mainly consists of two major sections:
- Control Plane (Master Node)
- Worker Nodes
You can think of Kubernetes like a company.
The Control Plane acts like management.
Worker Nodes act like employees doing actual work.
The Control Plane makes decisions.
Worker Nodes run applications.
High-Level Kubernetes Workflow
Here's the simplified Kubernetes flow:
User → kubectl → API Server → Scheduler → Worker Nodes → Pods
Everything inside Kubernetes revolves around this workflow.
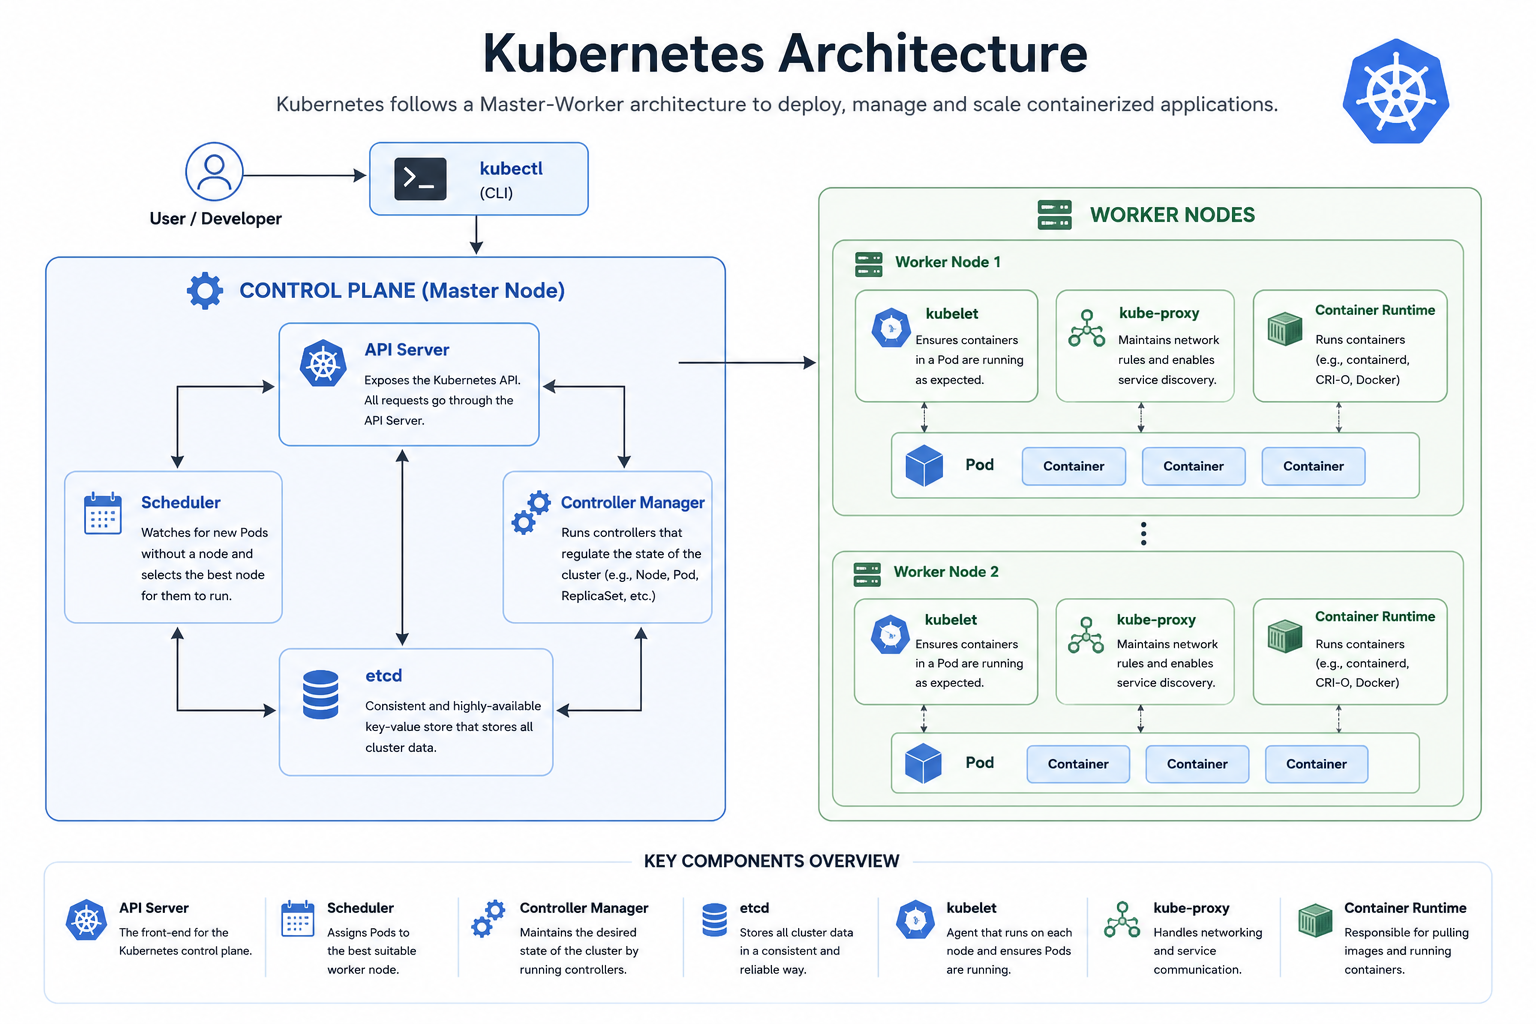
Now let's understand every component deeply.
1. Control Plane — The Brain of Kubernetes
The Control Plane is the central management system of Kubernetes.
It manages the entire cluster.
The Control Plane is responsible for:
- Scheduling workloads
- Maintaining cluster state
- Managing networking
- Monitoring nodes
- Handling API requests
- Scaling applications
Without the Control Plane, Kubernetes cannot function.
Main Components Inside Control Plane
The Control Plane contains several important components:
- API Server
- Scheduler
- Controller Manager
- etcd
Each component has a very specific responsibility.
2. API Server — The Entry Point of Kubernetes
The API Server is the heart of the Kubernetes Control Plane.
Every request inside Kubernetes passes through the API Server.
Whenever you run commands like:
kubectl get pods
kubectl apply -f app.yaml
the request first goes to the API Server.
What API Server Actually Does
The API Server is responsible for:
- Receiving requests
- Validating requests
- Authenticating users
- Updating cluster state
- Communicating with other components
You can think of API Server like the receptionist of Kubernetes.
Every request must go through it first.
Example Workflow
Suppose you deploy an application:
kubectl apply -f nginx.yaml
Internally:
- kubectl sends request
- API Server receives request
- API Server validates YAML
- Cluster state gets updated
- Scheduler starts working
Everything starts from the API Server.
3. etcd — Kubernetes Database
etcd is the database of Kubernetes.
It stores the complete cluster state.
This includes:
- Pods
- Nodes
- Configurations
- Secrets
- Services
- Deployments
Everything Kubernetes knows is stored inside etcd.
Why etcd is Important
Imagine etcd gets deleted.
Kubernetes would forget:
- Which Pods exist
- Which nodes are active
- Which services are running
That's why etcd is one of the most critical Kubernetes components.
It is highly available and distributed for reliability.
4. Scheduler — Decides Where Pods Run
The Kubernetes Scheduler decides which Worker Node should run a Pod.
When a new Pod is created:
- Scheduler checks available nodes
- Checks CPU and memory
- Checks resource availability
- Selects the best node
Then the Pod gets assigned to that node.
Real-Life Analogy
Imagine a hotel manager assigning guests to rooms.
The manager checks:
- Which rooms are available
- Room capacity
- Special requirements
The Scheduler works similarly for Pods.
5. Controller Manager — Maintains Desired State
The Controller Manager continuously watches the cluster.
Its job is simple:
Make sure the actual state matches the desired state.
Example
Suppose your Deployment says:
replicas: 3
Kubernetes must always keep 3 Pods running.
If one Pod crashes:
- Controller Manager detects failure
- Creates replacement Pod automatically
This self-healing behavior is one of Kubernetes' most powerful features.
Worker Nodes — Where Applications Actually Run
Worker Nodes are the machines where containers run.
These nodes perform the actual workload.
Every Worker Node contains:
- kubelet
- kube-proxy
- Container Runtime
- Pods
6. kubelet — The Node Agent
kubelet runs on every Worker Node.
It communicates with the Control Plane.
Its responsibilities include:
- Starting Pods
- Monitoring containers
- Reporting node status
- Ensuring containers remain healthy
If a Pod crashes, kubelet helps restart it.
7. Container Runtime — Runs Containers
Container Runtime is the software responsible for running containers.
Examples:
- containerd
- CRI-O
- Docker (older setups)
The runtime pulls container images and starts containers.
Without container runtime, Pods cannot run.
8. kube-proxy — Handles Networking
kube-proxy manages networking rules inside Kubernetes.
It handles:
- Pod communication
- Service networking
- Traffic forwarding
- Load balancing
This allows applications to communicate smoothly across nodes.
Understanding Pods in Kubernetes
Pods are the smallest deployable unit in Kubernetes.
A Pod contains:
- One or more containers
- Shared networking
- Shared storage
In most cases:
1 Pod = 1 Container
But multiple containers can exist together inside the same Pod.
Why Kubernetes Uses Pods Instead of Containers Directly
Kubernetes does not manage containers directly.
It manages Pods.
Pods provide:
- Shared networking
- Shared storage
- Better orchestration
- Easier scaling
Pods act as wrappers around containers.
Kubernetes Services Explained
Pods are temporary.
Their IP addresses can change anytime.
This creates networking problems.
Kubernetes Services solve this issue.
What is a Kubernetes Service?
A Service provides a stable network endpoint for Pods.
Even if Pods restart or change IPs, the Service remains stable.
Types of Kubernetes Services
1. ClusterIP
Default internal service.
Accessible only inside the cluster.
Used for:
- Backend APIs
- Internal databases
2. NodePort
Exposes application on a port of every node.
Example:
NodeIP:30080
Used mostly for testing.
3. LoadBalancer
Creates external cloud load balancer.
Used in production environments.
4. ExternalName
Maps service to external DNS name.
Example Service YAML
apiVersion: v1
kind: Service

metadata:
  name: nginx-service

spec:
  selector:
    app: nginx

  ports:
    - protocol: TCP
      port: 80
      targetPort: 80

  type: ClusterIP
How Kubernetes Networking Works
Every Pod in Kubernetes gets its own IP address.
Pods can communicate directly with each other.
Kubernetes networking ensures:
- Cross-node communication
- Service discovery
- Internal DNS resolution
- Load balancing
This networking model is one reason Kubernetes feels magical once properly configured.
Kubernetes Deployment Workflow
Now let's understand the complete Kubernetes workflow internally.
Step 1 — User Applies YAML
Developer runs:
kubectl apply -f deployment.yaml
Step 2 — API Server Receives Request
API Server validates the configuration.
Step 3 — etcd Stores Cluster State
Configuration gets stored inside etcd.
Step 4 — Scheduler Selects Node
Scheduler chooses the best Worker Node.
Step 5 — kubelet Starts Pod
kubelet communicates with container runtime.
Step 6 — Container Runtime Pulls Image
Runtime downloads container image.
Step 7 — Pod Starts Running
Application becomes active inside Kubernetes cluster.
Kubernetes Self-Healing Example
Suppose one Pod crashes.
What happens?
- Controller Manager detects failure
- Desired state becomes unhealthy
- Scheduler assigns replacement
- kubelet creates new Pod
Everything happens automatically.
This is why Kubernetes is so powerful for production systems.
Advantages of Kubernetes Architecture
Automatic Scaling
Applications scale automatically during traffic spikes.
Self-Healing
Failed Pods restart automatically.
Load Balancing
Traffic distributes across multiple Pods.
High Availability
Applications remain available even during failures.
Rolling Updates
Deploy new versions without downtime.
Better Resource Utilization
Kubernetes efficiently distributes workloads.
Common Beginner Mistakes in Kubernetes
Confusing Pods and Containers
Kubernetes manages Pods, not individual containers.
Using NodePort in Production
LoadBalancer or Ingress is usually better.
Ignoring Resource Limits
Can crash entire nodes.
Not Understanding Services
Networking issues become confusing quickly.
Deploying Without Monitoring
Production clusters require observability.
Final Thoughts
Kubernetes Architecture may look intimidating initially, but once you understand how the components connect together, the workflow becomes surprisingly logical.
At its core, Kubernetes simply does this:
- Accept requests
- Store cluster state
- Schedule workloads
- Run containers
- Maintain desired state automatically
That's the foundation of Kubernetes.
Once this internal flow becomes clear, advanced topics like:
- Helm
- Ingress
- Service Mesh
- Kubernetes Networking
- CI/CD Pipelines
- GitOps
become much easier to learn.
Kubernetes is no longer just a trending technology.
It has become the backbone of modern cloud-native infrastructure and large-scale containerized application